
February 2023

Planning a garden with MaggsyMade
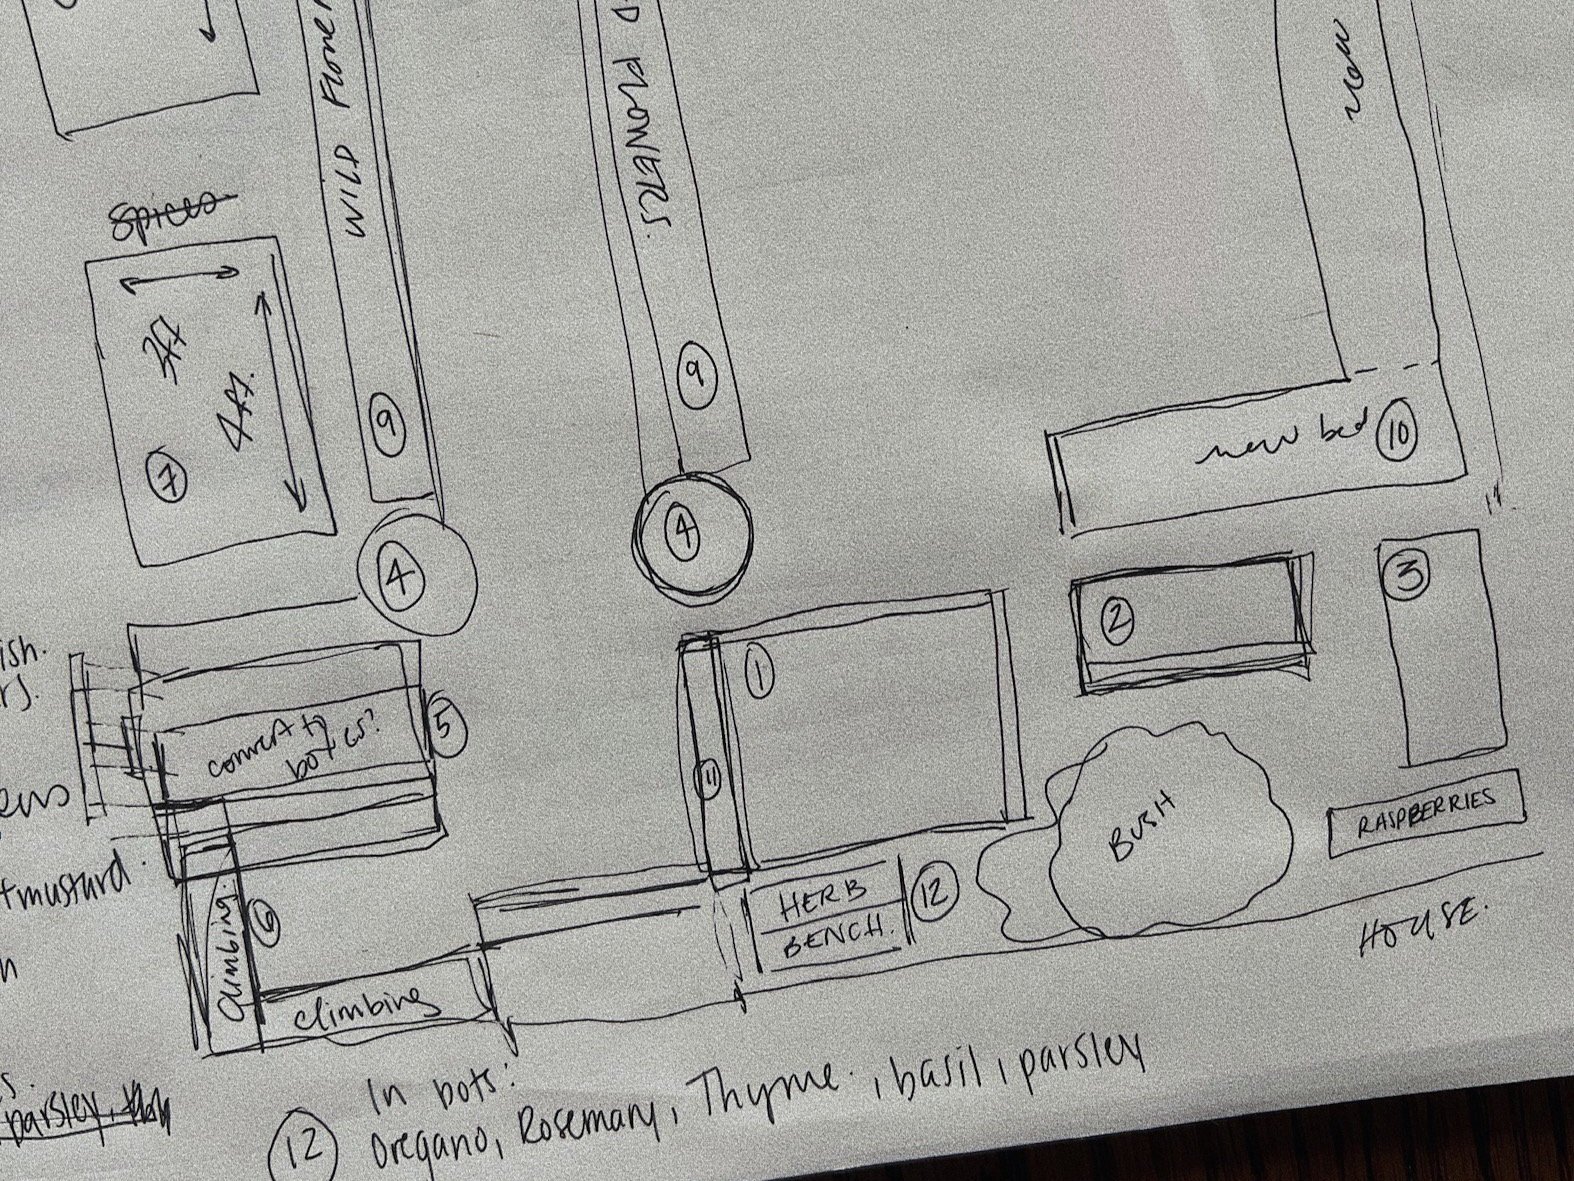
I’m going to take you through the planning of my own garden and touch upon certain things that I believe are important to do for any garden, regardless if it’s your first or 50th season. This planning is generally done with 2-3 sheets of paper and a good pen.
I like to start each gardening season by writing down all the vegetables I’d like to eat and potentially would preserve if any extra remained. Not what I’d like to grow. There’s a difference. If you’re in your first few years, don’t overwhelm yourself. Start small and remember successful small years turn into successful big years.
I then write down what I grew last year and where. (If you haven’t A., do your best to remember and B., be sure to do it this year). I have a beautiful garden journal but I generally first note it on my phone for easy access. And whether you’re growing in pots, in the ground or in raised beds it’s good to move around your crops. Certain plants take higher tolls on their environments in different ways. When you rotate what’s planted where, you’re allowing your soil to stay healthy as certain plants can “fix” problems left over from the year before, or at least not take the same toll again and can keep away pests/diseases.
Crop rotation can be technical and confusing. Even when I’m on Pinterest sometimes I see contradicting pins. And depending on the size of your garden, it may not be entirely possible. That being said, the general rule of thumb I follow is to not plant the same things in the same place 2 years in a row, to note which rotations worked well each year (after spending time on Pinterest) and in cases where it’s not possible to rotate, keeping the garden clean, fertilizing where necessary and replenishing the soil.At this point you’ll have a list of what you’d like to grow and what you grew last year. Now here’s the challenging albeit fun part. You’re going to want to now look up companion plant lists, and begin combining different vegetables on your list based on who will grow successfully together AND checking to see who is a bad neighbor. (Maybe next year I’ll create a guide for this, let me know if you’d like that). Save an afternoon for some therapeutic research. Also keep in mind your crop rotations, in the back of your mind.
Finally, the last thing to consider is what you’ll be purchasing from the nursery vs. what you’ll be growing from seed. In the March memo I’ll review the basics for growing from seed at home and include a list of what to start with and what to never attempt!
This year I’ll be growing three things I’ve never grown before: mini watermelons, as per request from my 2 year old, loofah gourds so that I can be that host that offers towels, toothbrushes and home-grown loofahs and I will be dedicating two long and thin raised beds to growing wild/cut flowers.

The Elevated Veggie Tray
METHOD
1. Wash, peel and slice your veggies into long and thin pieces and with your radicchio pull apart your leaves.
2. Once prepped, begin adding on one end of your dish, alternating vegetables. This feels messy and you might think to yourself, “there is probably a better way to do this” if you find it let me know.
3. Once you have enough veggies in, they’ll be able to support themselves vertically. Add in pieces of dill and parsley and fill out any gaps with additional veg.
4. Supply a dip of some kind for the side, or if you have room, in the middle of your tray (I personally love good ol’ ranch and homemade hummus.
There are several factors here that make it difficult to give exact quantities of the veggies, because it all depends on size of your serving container. I opt for a capsule glass roasting dish as it’s my favourite shape right now. ALSO, don’t make too far ahead of time, this was made for my son’s first birthday, i made it at 7am the day of, his party was in the afternoon and some of the veggies had begun to wilt, so try and make it close to your event!
INGREDIENTS
• Red, orange & yellow peppers
• Mini cucumbers
• Colourful carrots
• Broccolini (the sweeter sexier cousin of broccoli)
• Winter radish aka Daikon
• Radicchio aka Italian chicory
• Bunch of parsley
• Bunch of dill

Sourdough (Discard) Doughnuts
INGREDIENTS
DOUGHNUTS
• 3/4 CUP whole milk
• 1/4 CUP granulated sugar
• 2 1/3 TEASPOONS yeast
• 1/2 CUP sourdough discard
• 2 large eggs, gently beaten
• 1/2 CUP (8 TABLESPOONS) unsalted butter, melted
• 1 TEASPOON kosher salt
• 3 and 1/3 plus up to 1/2 CUPS AP flour
• oil for deep frying (we use canola in our deep fryer), if using a pot, make sure it’s deep and add at least 3 inches of oil.
GLAZE
• 3 CUPS powdered sugar
• 1/2 CUP + a few TABLESPOONS heavy cream
• 1 TABLESPOON vanilla extract
• pinch of kosher salt
METHOD
1. Heat up your milk until it reaches between 115F-125F (I generally do this with short bursts in the microwave). Add the milk to the bowl of your stand mixer and add your sugar and yeast. Gently stir. Wait until the mixture has begun to foam (3-5 minutes).
2. Add in discard, eggs, unsalted butter and salt. Slowly begin adding your flour, one cup at a time. Knead on low for about 3-5 minutes until smooth. I like to start it in the stand mixer and then finish it off by hand on a lightly floured surface. This dough will feel on the wetter side but it shouldn’t be sticky, be careful not to add too much flour.
3. Once kneaded, add to a lightly oiled bowl. Cover tightly and place into the fridge for either 1-3 hours or overnight (8-10 hours) until nice and cold. Remove and add to a lightly floured surface, rolling the dough out to 1/2 inch thickness. Now you can cut the doughnuts out. I don’t have proper cutters so I generally use a metal one-cup measuring cup and a metal piping tip. Once cut place on baking sheets lined with parchment paper. Leave enough room for them to rise. Cover and let rise for about 1 hour or until they look puffy. You’ll have your classic doughnuts and the innermost part you can set aside to make “timbits”.
4. Near the end of the rising time, heat your oil to 350 F. Prepare your glaze by sifting your powdered sugar into a bowl. Add in 1/2 CUP heavy cream, vanilla and salt. Whisk together, it should be on the thicker side but not too thick. Add a few tablespoons to make it thinner. If you make it too thin add additional sugar. Create your frying station, you’ll need your donuts to one side of your oil, on the other side you’ll want a paper towel lined sheet for soaking up oil, followed by your glaze, followed by parchment paper sheets where your glazed doughnuts can harden.
5. Time for a conveyer belt. Start by adding a few doughnuts at a time to your hot oil, cooking each side for 1 minute before flipping over. Place onto paper towel lined sheets. Add next batch of doughnuts to oil. During the first minute of the second batch being in the oil, take your first batch and place them in the glaze, flipping over to coat fully, then place on final parchment paper. Repeat this process until all the doughnuts are complete.
6. For your timbits, fry for about 20-30 seconds. You may not be able to flip them successfully so continue to move them around in the oil for about 1 minute in total.
7. ENJOY!